Windows 11 introduces a sleek and modern interface with numerous features designed to enhance productivity and user experience. However, over time, even the most advanced systems can slow down due to various factors. This guide provides practical steps to optimize Windows 11 for better performance, ensuring your PC runs smoothly and efficiently.
1. Update Windows Regularly
Why It’s Important:
- Security and Stability: Regular updates include performance improvements, security patches, and bug fixes that can enhance your system’s overall stability.
How to Update:
- Action: Go to Settings > Update & Security > Windows Update. Click “Check for updates” to ensure your system is up-to-date.
2. Manage Startup Programs
Why It’s Important:
- Faster Boot Times: Disabling unnecessary startup programs can reduce boot time and free up system resources.
How to Manage:
- Action: Right-click the taskbar and select “Task Manager.” Go to the “Startup” tab and disable programs that are not essential.
3. Clean Up Disk Space

Why It’s Important:
- Improved Performance: Freeing up disk space can help improve overall system performance and prevent slowdowns caused by a cluttered drive.
How to Clean Up:
- Action: Go to Settings > System > Storage. Click “Temporary files” and select “Remove files” to clear unnecessary files. You can also use the built-in Disk Cleanup tool by searching for it in the Start menu.
4. Optimize Visual Effects
Why It’s Important:
- Better Performance: Reducing visual effects can help improve system performance, especially on lower-end hardware.
How to Optimize:
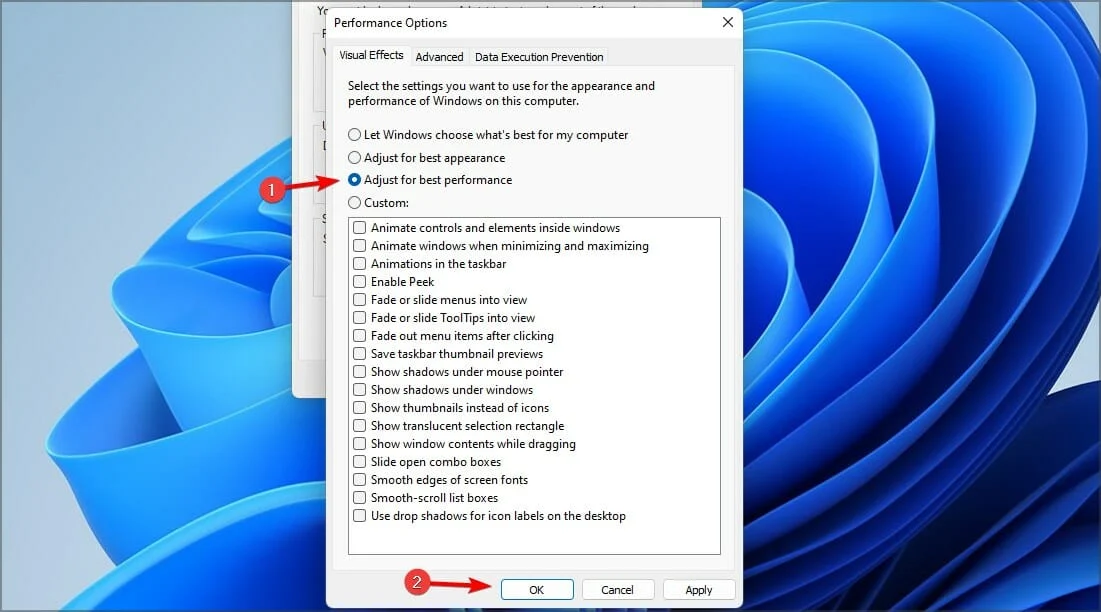
- Action: Go to Settings > System > About and click “Advanced system settings.” Under the “Performance” section, click “Settings” and choose “Adjust for best performance” or manually select the visual effects you want to disable.
5. Check for System Resource Usage
Why It’s Important:
- Identify Bottlenecks: Monitoring system resource usage can help identify which applications or processes are consuming excessive CPU, memory, or disk space.
How to Check:
- Action: Open Task Manager (Ctrl + Shift + Esc) and review the “Processes” and “Performance” tabs. Look for high resource usage and consider closing or managing resource-intensive applications.
6. Adjust Power Settings
Why It’s Important:
- Optimize Performance: Adjusting power settings can help balance performance and energy efficiency, especially on laptops.
How to Adjust:
- Action: Go to Settings > System > Power & battery. Choose “Power mode” and select “Best performance” for optimal performance.
7. Disable Unnecessary Animations
Why It’s Important:
- Faster Response: Disabling unnecessary animations can make the interface feel more responsive and reduce the load on your system.
How to Disable:
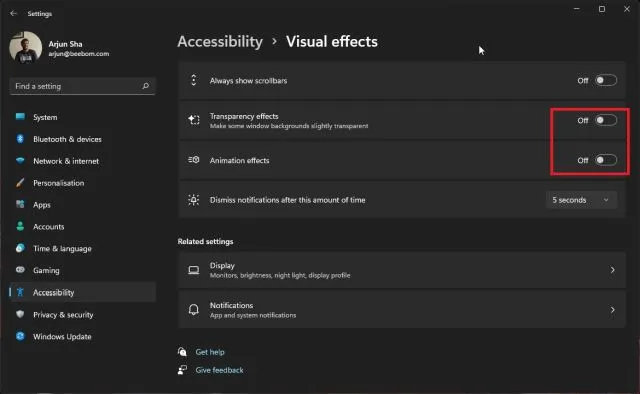
- Action: Go to Settings > Accessibility > Visual effects. Toggle off the “Animation effects” to reduce animations.
8. Update Device Drivers
Why It’s Important:
- Compatibility and Performance: Updated drivers ensure that your hardware components work efficiently and are compatible with the latest system updates.
How to Update:
- Action: Go to Device Manager (right-click the Start button and select it). Right-click each device and select “Update driver.” Follow the prompts to search for and install the latest drivers.
9. Run Performance Troubleshooter
Why It’s Important:
- Automatic Fixes: The performance troubleshooter can automatically detect and fix common issues that may be affecting your system’s performance.
How to Run:
- Action: Go to Settings > System > Troubleshoot > Other troubleshooters. Find and run the “Performance” troubleshooter.
10. Upgrade Hardware Components
Why It’s Important:
- Enhanced Performance: Upgrading hardware components such as RAM, SSD, or graphics card can provide a significant boost in performance, especially for demanding tasks.
How to Upgrade:
- Action: Research compatible hardware upgrades for your system. Consult your PC’s documentation or a professional technician for installation and compatibility advice.
11. Defragment and Optimize Drives
Why It’s Important:
- Improved Disk Access: Regularly defragmenting and optimizing your drives can improve file access times and overall system performance.
How to Defragment:
- Action: Go to Settings > System > Storage. Click “Optimize Drives” and select your drive. Click “Optimize” to start the defragmentation process.
12. Enable Storage Sense
Why It’s Important:
- Automatic Maintenance: Storage Sense helps automatically manage and free up disk space by deleting temporary files and managing local content.
How to Enable:
- Action: Go to Settings > System > Storage. Toggle on “Storage Sense” and configure its settings according to your preferences.
Conclusion
Optimizing Windows 11 for better performance involves a combination of regular updates, system maintenance, and adjustments to settings. By following these practical tips, you can ensure that your PC runs efficiently and remains responsive to your needs. Whether you’re managing startup programs, cleaning up disk space, or upgrading hardware, these steps will help you get the most out of your Windows 11 experience.
